Using calipers (preferred), measuring tape, or a ruler, measure your firearm’s factory (nonadjustable) piston length relative to its bolt carrier. Measure from the front face of the piston to the front nose of the carrier. Record this distance.
Gripping the piston shaft (not the piston head), begin threading the CDT piston base into the nose of your new bolt carrier. If you’re reusing your existing carrier, the carrier piston pin will first need to be drilled and / or punched out and old piston removed. Continue threading until the roll pin holes on the piston align with the holes in the carrier nose.
The piston head is shipped in a preset “factory AKM” position, meaning it will mimic the length and performance of a standard piston. If the piston head was accidentally adjusted before or during installation, simply rotate / adjusted the piston head until the back of it aligns with the first of ten position grooves located along the piston shaft (9.5 position grooves should be visible).
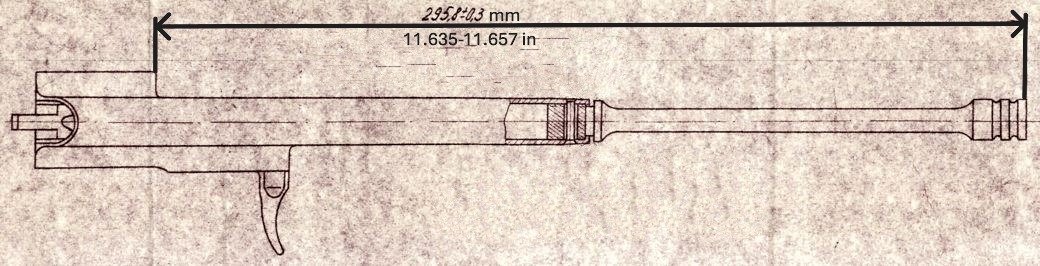
Next, repeat the measurement taken in step 1, this time with the CDT piston and new bolt carrier. Note this measurement and compare it to the measurement recorded in step 1. If the two measurements are the same, continue on to step 5. If not, continue adjusting the piston position by threading it into or out of the carrier nose until it matches the first distance (as a secondary check, you can also measure and compare the distance from IMAGE 1 below).
Once in position (and holes aligned), start driving in the supplied roll pin from one side using a hammer and starter punch. Continue to drive the roll pin in until it’s sitting slightly below flush with the outer diameter of the carrier nose (note: the roll pin will not protrude on the other side).
That’s it! As mentioned in step 3, the piston head is shipped in a preset “factory AKM” position which mimics the length and performance of a standard piston. You can verify this by checking the position of the rear of the piston head, which should be aligned with the first of ten position grooves located along the piston shaft. If the piston head was adjusted before or during installation, simply adjusted it back to the first position groove described above (9.5 position grooves should be visible).
Rotating the piston head clockwise (making the piston shorter) will result in a slower bolt carrier cyclic speed and help mitigate issues associated with over-gassing, as well as offset negative effects resulting from suppressor or high pressure ammo use. Adjust the piston head until desired performance and reliability are achieved. ALWAYS ENSURE YOUR FIREARM IS UNLOADED, POINTED IN A SAFE DIRECTION, AND SAFETY IS ON BEFORE DISASSEMBLY TO ADJUST THE PISTON!!!
WARNING: DO NOT FULLY DISASSEMBLE PISTON!!! If threads appear while adjusting the piston head position, STOP! Reassembly can be difficult and may result in lost components. Internal cleaning is not necessary.